Around 3200 Rss Feed readers​​ Already joined, Have you?

How To Extract All Keywords From Google Analytics

Sunday, May 29, 2011

Many readers find the method on this post quite difficult so I wrote an easier alternative method to save all the keyword from Google analytics tool: How To Export All The Keywords From Google Analytics
 
Google analytics does not allow you to download more then 500 keywords from Google analytics. But there is a method to savee all the all keywords, say about 2000 in a CSV file.

Steps:

1. Log onto Google analytics and select report for the desired site
2. Click Traffic Sources and then select Keywords which appears under that category
3. Now, on you address bar you will see a link like this:
4. Add &limit=5000 at the end of the url and the link will be like
4. Click enter
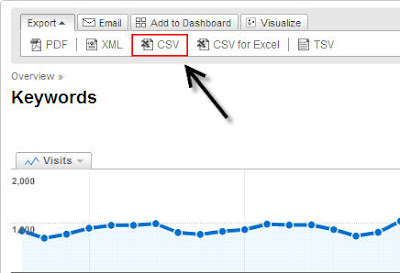
5. Now click export and select CSV

keyword export in Google analytics 

6. Download and save the file
Screenshot of my CSV file:

Read More - How To Extract All Keywords From Google Analytics

"java code for blogger"

Showing HTML or JAVA code like the screenshot below is not as easy as you think. Try posting HTML code inside the posts, you will notice that the HTML code gets hidden.
example of html and javascript showing in blogger post


The Solution:
First Step: Log onto blogger and go to Dashboard –> Layout –> Edit HTML and look for the this code by find option (Ctrl + F)
]]>
Above ]]>, paste the code given below:
pre
{
background:#efefef;
border:1px solid #A6B0BF;
font-size:120%;
line-height:100%;
overflow:auto;
padding:10px;
color:#000000 }
pre:hover {
border:1px solid #efefef;
}
code {
font-size:120%;
text-align:left;
margin:0;padding:0;
color: #000000;}
.clear { clear:both;
overflow:hidden;
}
After that click save.
For putting any HTML or JAVA code inside the post you have to first convert the code into escaped characters. To convert the code go to QUICK ESCAPE TOOL, insert the code and click “convert to escaped characters”

Now you have to put that converted code inside the post within “pre” tag as shown below:
And finally click publish post!
Read More - "java code for blogger"

JS-Kit Comment: Alternative Systems Comments on Blogger

Monday, May 23, 2011

This time there are alternatives provided by js-kit for blogspot and wordpress comment box, quite fairly easy and practical. equipped with such an avatar photo from facebook, yahoo, and much more, if you have a photo avatar from facebook, you can display it on when you commented on the blog! curious? okay! now I will explain how to install to blogspot and to wp patient huh? heheheh ..


The first step: 

1. login you keblog 
2. click for the blog layout and Indonesian click layout 
3. click edit html 
4. on the edit html page you had been instructed to download the template. 
5. then stored in a computer document

Step Two:

1. visit this web address: http://js-kit.com/comments/?wow 
2. note the blogger logo in it and then click. 
3. see instructions in step 1 
4. input your domain name example: http://yourdomain.blogspot.com then input your account and password of your blog. and wait until finished

Third step:

1. go to step2 and upload the template you downloaded earlier 
2. wait until complete and save the command box appears. 
3. you after the save, upload the results back from the file that you save from js-kit to your blog, and then save again

Until here all phases are finished .. Please try :)
Read More - JS-Kit Comment: Alternative Systems Comments on Blogger

Javascript in Blogger Hosting Solutions

When the most unpleasant moment the javascript file where we store on another host start running out of bandwidth. An interactive blog that originally seen even so chaotic tampilanya khan. Well, this is one keleman bloggers because they do not give us the capacity of disk space, especially those dealing with the javascript file. As an alternative we can usually only borrow free web hosting from a third party, unfortunately the offer provided was not always satisfactory. storage capacity offered big hell, but so useless when given bandwidth capacity is not comparable hehehe. Well, here I try to share tips to overcome the problem of hosting javascript in blogger, hopefully enough to help.

Change the format of the file extension from .Js to .Txt

Remember, not all the javascript is called by the ending .Js, this is an advantage where we can store and call the javascript file in a text format that are stored in the format .txt

Not all free web hosting services provide the flexibility for us to store the file format. Js in hosting them, so we can outsmart just by changing the extension from .Js to .txt

How to call a javascript format .txt file on another host:

<script type="text/javascript" src="address-url-filename.js" />

The invitation can be replaced with

<script type="text/javascript" src="address-url-filename.txt" />

Save Javascript in an HTML page element / Blogger Gadget

Not all the javascript code should be in store in other hosts or only in the Edit HTML page, we could have put this JS code directly on the blogger page element "HTML / Javascript". Unfortunately this does not always 100% successful, because not all javascript files can support the storage of this widget. Perhaps the only successful if the javascript code is only stand alone, in terms of JS files are not interconnected with one calling code and other code.

Save the javascript code directly in HTML EDIT page 

Platform bloggers actually frees us to put the code directly javascipt on Edit HTML page. The way I apply these always succeed, but sometimes not very effective as well if the javascript code that we use the script code is too long. This last way I think is the best one that should be attempted.

Before you try the method below, make sure that we already have a JS code that will be saved. If someone is still confused, JS code can be found directly by taking the URL address. see example below calling code are printed bold. JS code and there are usually stored.  

<script type="text/javascript" src="address-url-filename.js" /> 

Try to directly input the URL in your browser, if you have found any live copy the code. 

JS code for previously in other host can be directly used dialamat diblogger, we can directly use the code below. 

<script type='text/javascript'>
//<![CDATA[
Fill_Script_Here
//]]>
</script> 

Hopefully the above can solve the problem running out of bandwidth, if ya still have problems staying just use a paid hosting goes wrong .. 
Read More - Javascript in Blogger Hosting Solutions

Page Peel Effect using jQuery & CSS

Tuesday, May 17, 2011

If no one ever wrote my first tutorial on style ads Page Peel huh? try opening the archive before ... never see you:) oh yes it turns out there are 2 different tutorials ever published, the first to use the style display Page Ear Javascript, then this is the same .. Sexy Curls jQuery Plugin. Well, for a foreign partner with the term rada Page Peel, please go back to previous records on the second link above yes.

Advanced Ok, well this time I found the latest Peel artificial Page Sohtanaka.com with coding that is of course very different from the above two Page Peel, Sohtanaka not use complicated coding setup, so just put it directly associates live page blog. Although there is little to be edited, and even then just change the look of the picture and link purpose only. When viewed at a glance, for it looks almost the same style, where when you point your mouse at this PagePeel area, it will show the page as you open the roll up a piece of paper and found another page dilembar vice versa. See demo here.  


How To Install:

Put the following jQuery script code on code <b:skin><![CDATA[

<script src='http://code.jquery.com/jquery-latest.js' type='text/javascript'/>
<script type='text/javascript'>
$(document).ready(function(){
//Page Flip on hover
$(&quot;#pageflip&quot;).hover(function() {
$(&quot;#pageflip img , .msg_block&quot;).stop()
.animate({
width: &#39;307px&#39;,
height: &#39;319px&#39;
}, 500);
} , function() {
$(&quot;#pageflip img&quot;).stop()
.animate({
width: &#39;50px&#39;,
height: &#39;52px&#39;
}, 220);
$(&quot;.msg_block&quot;).stop()
.animate({
width: &#39;50px&#39;,
height: &#39;50px&#39;
}, 200);
});
});
</script>

Then put the CSS code below the above code]]> </b:skin>

#pageflip {
position: relative;
right: 0; top: 0;
float: right;
}
#pageflip img {
width: 50px; height: 52px;
z-index: 99;
position: absolute;
right: 0; top: 0;
-ms-interpolation-mode: bicubic;
}
#pageflip .msg_block {
width: 50px; height: 50px;
overflow: hidden;
position: absolute;
right: 0; top: 0;
background: url(http://img222.imageshack.us/img222/9213/subscribe.png) no-repeat right top;
}

Put this code under the tag <body>

<div id='pageflip'>
<a href='http://feeds2.feedburner.com/thenameofyourfeed
'>
<img alt='' src='http://img224.imageshack.us/img224/8315/pageflip.png'/>
<span class='msg_block'/>
</a>
</div>

Please be saved and see the results. Remember! Display the above only as an example, yes, peer can change the image and link any purpose as desired. 
Read More - Page Peel Effect using jQuery & CSS

Displaying Images Transparent, mouseover Effect

This means what? ok, than my colleagues try jelasin lengthy preview samplenya in zoomtemplate.com, if already try now point to the picture page of posts there .. nah colleagues will see the effect where the original image will be dim light or it could be vice versa from dim to bright when it passed the mouse. Perhaps the meaning is clear enough, yes, immediately wrote to the next.

 How it works transparently above the image effect is not so difficult, we need only use the CSS Image Opacity property. But before you should also know the CSS opacity property was not included in the standard CSS, which this property only works well on some modern web browsers only.

Code mouseover effect from dim to brighter (set directly in the picture)

<img src="Save the image location url" style="opacity:0.4;filter:alpha(opacity=40)"
onmouseover="this.style.opacity=1;this.filters.alpha.opacity=100"
onmouseout="this.style.opacity=0.4;this.filters.alpha.opacity=40" />

Code mouseover effects from bright to dim (set directly in the picture)

<img src="Save the image location url" border="1" style="opacity:1;filter:alpha(opacity=100)"
onmouseover="this.style.opacity=0.4;this.filters.alpha.opacity=40"
onmouseout="this.style.opacity=1;this.filters.alpha.opacity=100"/>

Maybe a bit too complicated if each image must be set one by one the value of his property, now co-direct for each post having an effect this automatically, can simply add this CSS code:

 .post img{opacity:1;filter:alpha(opacity=1); this.style.opacity=6}

.post img:hover{opacity:.5;filter:alpha(opacity=100); this.style.opacity=1}

To my knowledge Firefox usually uses the property opacity: x for doing tranparancy, unlike IE which uses a filter: alpha (opacity = x). In Firefox opacity: x value of x can be filled with values ​​between 0.0 -1.0, while the IE filter: alpha (opacity = x) the value of x between 000-100.

Read More - Displaying Images Transparent, mouseover Effect

Increase Blog Traffic Through Twitter With Button Install tweetmeme / retweet

A lot of effort to increase traffic, one may share it through social networking twitter. But beyond just sharing articles via twitter alone is not enough you know, no problems at Twitter friend list if we have reached thousands of followers, but kalo cuman 50-100 does not seem too effective. Well, from the dizzy every day to follow people who do not clear, let alone the main purpose kesedar only reproduce a friend, would that we ask for help the reader himself to share our articles link on their twitter each. The easiest way one can by installing buttons from tweetmeme or Retweet.

To install tweetmeme button is very easy, first view the first entry EDIT HTML, then check the Expand Widget Templates. If so, look for the red color code and put that code right underneath the blue button.

<div class='post-header-line-1'/>

<div style='float:right; margin-left:10px;'>
<script type='text/javascript'>
tweetmeme_url = &#39;<data:post.url/>&#39;
</script>
<script src='http://tweetmeme.com/i/scripts/button.js' type='text/javascript'> </script>
</div> 

Similar to the way above, install Retweet button is also very easy, first view the first entry EDIT HTML, then check the Expand Widget Templates. If so, look for the red color code and put that code right underneath the blue button. 

<div class='post-header-line-1'/>


<script type="text/javascript">
url = '<data:post.url>';
</script>
<script type="text/javascript" src="http://www.retweet.com/static/retweets.js"></script>

 
If you want small size:

<script type="text/javascript">
url = '<data:post.url>';
size = 'small';
</script>
<script type="text/javascript" src="http://www.retweet.com/static/retweets.js"></script>
 

Little information, tweetmeme or Retweet has its own counter value to assess how much of our links that have been distributed by the reader. we can see that value directly on button. 
Read More - Increase Blog Traffic Through Twitter With Button Install tweetmeme / retweet

How to set homepage on Blogger Comments

Still in commemorating the anniversary of bloggers is the 10th, this time adding new features more bloggers that is in addition to visitor comments, can also directly display the comments along with their blogger profile photo. The facility is very similar to predictably tutorial I wrote some time lulu here and here. Unfortunately, to be able to display comments Avatar on Blogger, we need the login status.


Blogger also provides an easy to directly upload a profile picture when we want to leave a comment, the commentary select the Preview button, click the "Add Photo" to upload photos to Blogger profile. Next when we leave a comment diBlogger, profile picture will be instantly displayed on the comments field.

 
To enable or disable the profile images on comments, open the Settings page - Comments. Then put a check "Yes" in the "Show profile images on comments?" 

Just info, some templates that have been modified may be problematic with Avatar fasititas this comment, but do not worry everything can be back to normal.
Read More - How to set homepage on Blogger Comments

Recovering and Enabling feedback on Custom Template Blogger Avatar

By default avatar actually comment on fellow bloggers can directly activate without changing anything on that yet dimodifkasi tempate. But this would be problematic if the template in use today are already using custom templates. Now let me comment this avatar can look back is very easy, just follow the tutorial below:


Enable comments on Custom Template Blogger Avatar

First look for the code below.

<dl id='comments-block'>  

Then replace the above code with the code below. 

<dl expr:class='data:post.avatarIndentClass' id='comments-block'> 

After changing the above code, then look for the line of code below. 

<a expr:name='data:comment.anchorName'/>  

Then put the following code after the code above. 

<b:if cond='data:blog.enabledCommentProfileImages'>
        <data:comment.authorAvatarImage/>
 </b:if> 

To enable or disable the profile images on comments, open the Settings page - Comments. Then put a check "Yes" in the "Show profile images on comments?" 

Returns the Avatar comment if you use the avatar of MyBloglog 

Previously I've written a tutorial to install using mybloglog avatar comment, well when colleagues just want to use standard avatars bloggers, colleagues can easily restore it. follow the tutorial below. 

To facilitate co-delete the code, first try searching the first code below

<b:loop values='data:post.comments' var='comment'>  

Then look at the line of code like this below 

<div style='border:0;float:left;margin: 0 5px 0 0;'>
<script>
myBlogAvatar('<data:comment.id/>','<data:comment.authorUrl/>');
</script>
</div>
 

If you've met, lived erase all the code above, then follow again how to turn on comment avatars as indicated above. 
Read More - Recovering and Enabling feedback on Custom Template Blogger Avatar